Web3 Magic: How to create a paid membership community on Common Ground with Unlock Protocol
Web3 Magic: How to create a paid membership community on Common Ground with Unlock Protocol
In this guide you learn how to create a paid membership community, leveraging NFTs, Unlock Protocol and of course, Common Ground.

Published on April 19, 2024
April 19, 2024
Understanding Composability
Composability in Web3 refers to the ability of different protocols and platforms to interact seamlessly, enabling the creation of complex and customizable solutions. This modularity allows developers and creators to build upon existing components without starting from scratch.
Leveraging composability for your community means:
Integration of Tools:
Combine various Web3 tools to create a unique community that lives onchain. For instance, integrate membership management with Unlock Protocol and social interaction features from Common Ground.Customization and Flexibility:
Tailor your community features to meet specific needs. Use composable smart contracts to manage memberships, access controls, and payment systems effortlessly.Interoperability:
Ensure your community benefits from the interoperability of Web3 protocols. This means your community can interact with other platforms and services, enhancing user experience and engagement.Decentralized Ownership:
By leveraging Web3's composability, you maintain true ownership of your community by making it effectively platformless. This decentralized approach ensures that control remains with you and your members, not a central authority.
Enter Unlock Protocol
Unlock Protocol offers a set of open source and purpose built smart contracts specifically for community memberships and subscriptions. The smart contracts let you add time constraints, update pricing, and handle recurring payments.
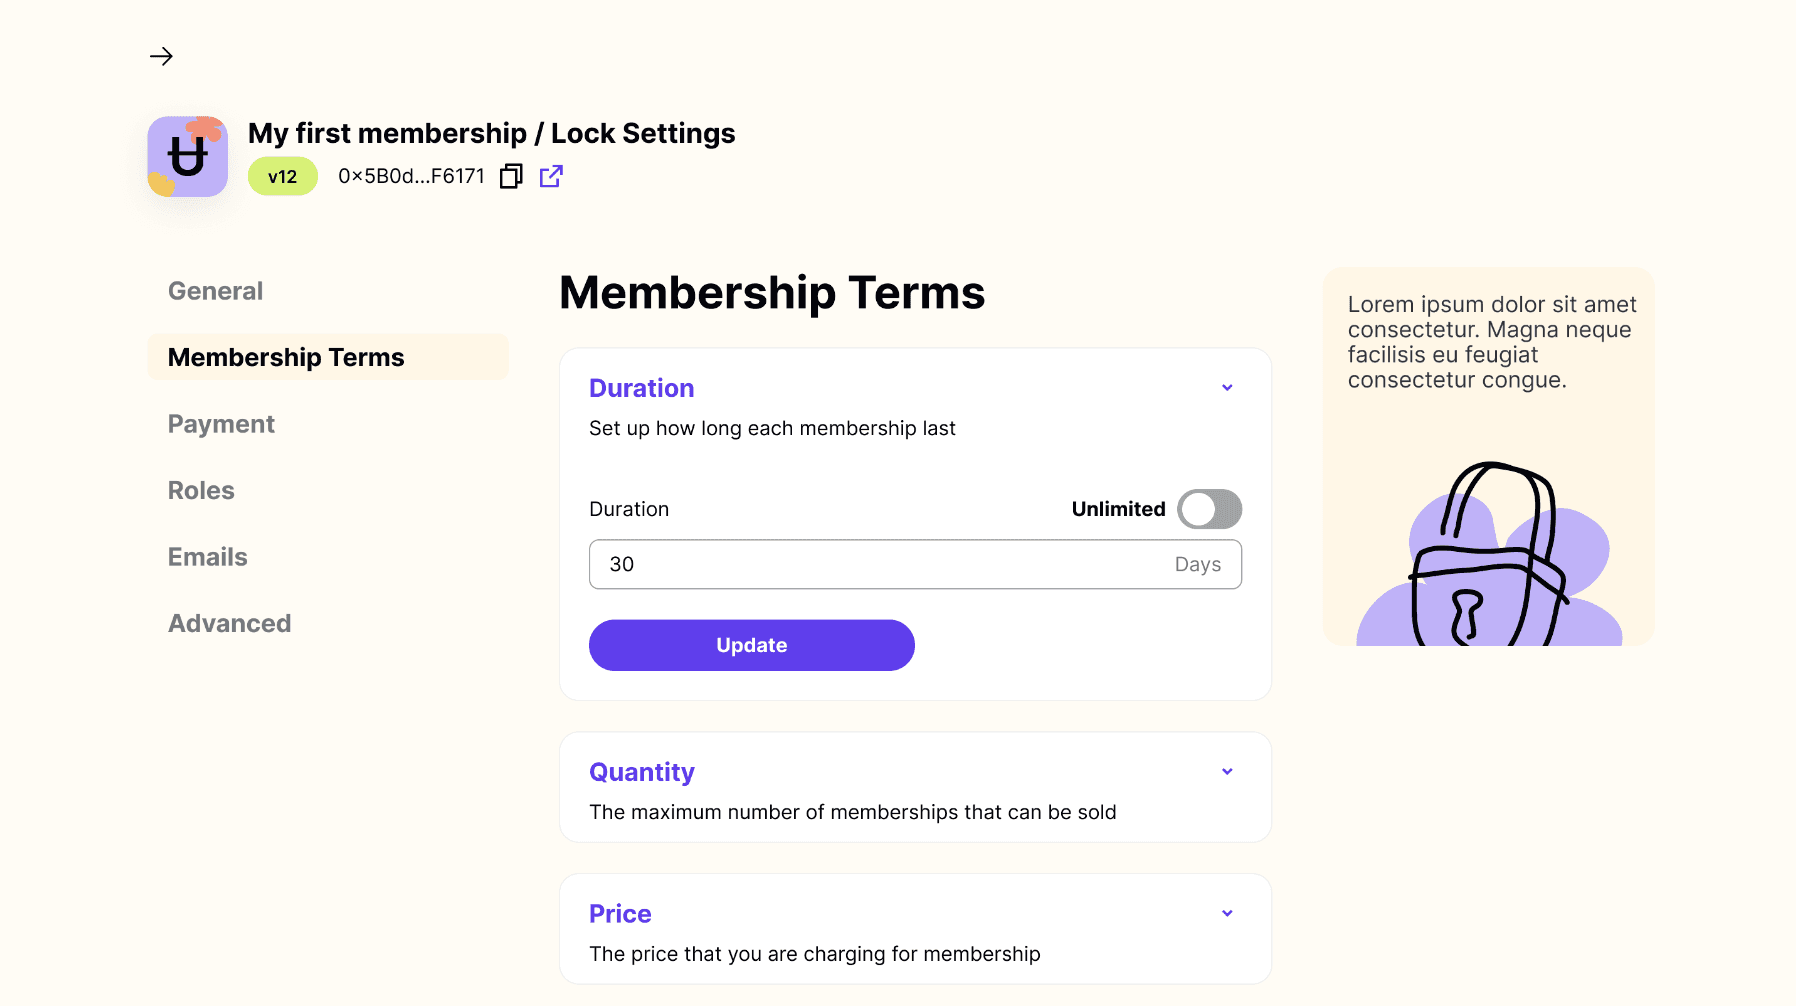
Step-by-Step Guide to Creating a Membership NFT Contract on Unlock Using Their Website
Let's dive in. This is a step-by-step guide to create your first Membership NFT with Unlock Protocol.
Step 1: Access the Unlock Dashboard
Go to the Unlock Protocol Dashboard.
Step 2: Create a New Lock
Click on "Create Lock".
Choose between two kinds of onchain attestations: organize event and sell tickets or create a certification about someone's expertise on chain. Both of these contracts are NFT contracts.
Fill in the lock details:
Lock Name: Choose a name for your membership contract.
Currency: Select the currency (e.g., ETH, DAI).
Price: Set the price for membership.
Duration: Define the duration of the membership (e.g., 1 month, 1 year).
Set the total number of memberships available (if limited).
Choose whether memberships are transferable or not.
Step 3: Deploy the Lock
Review the details and confirm.
Approve the transaction in your wallet to deploy the lock.
For illustration purposes I created a certification-style NFT, which looks like this:
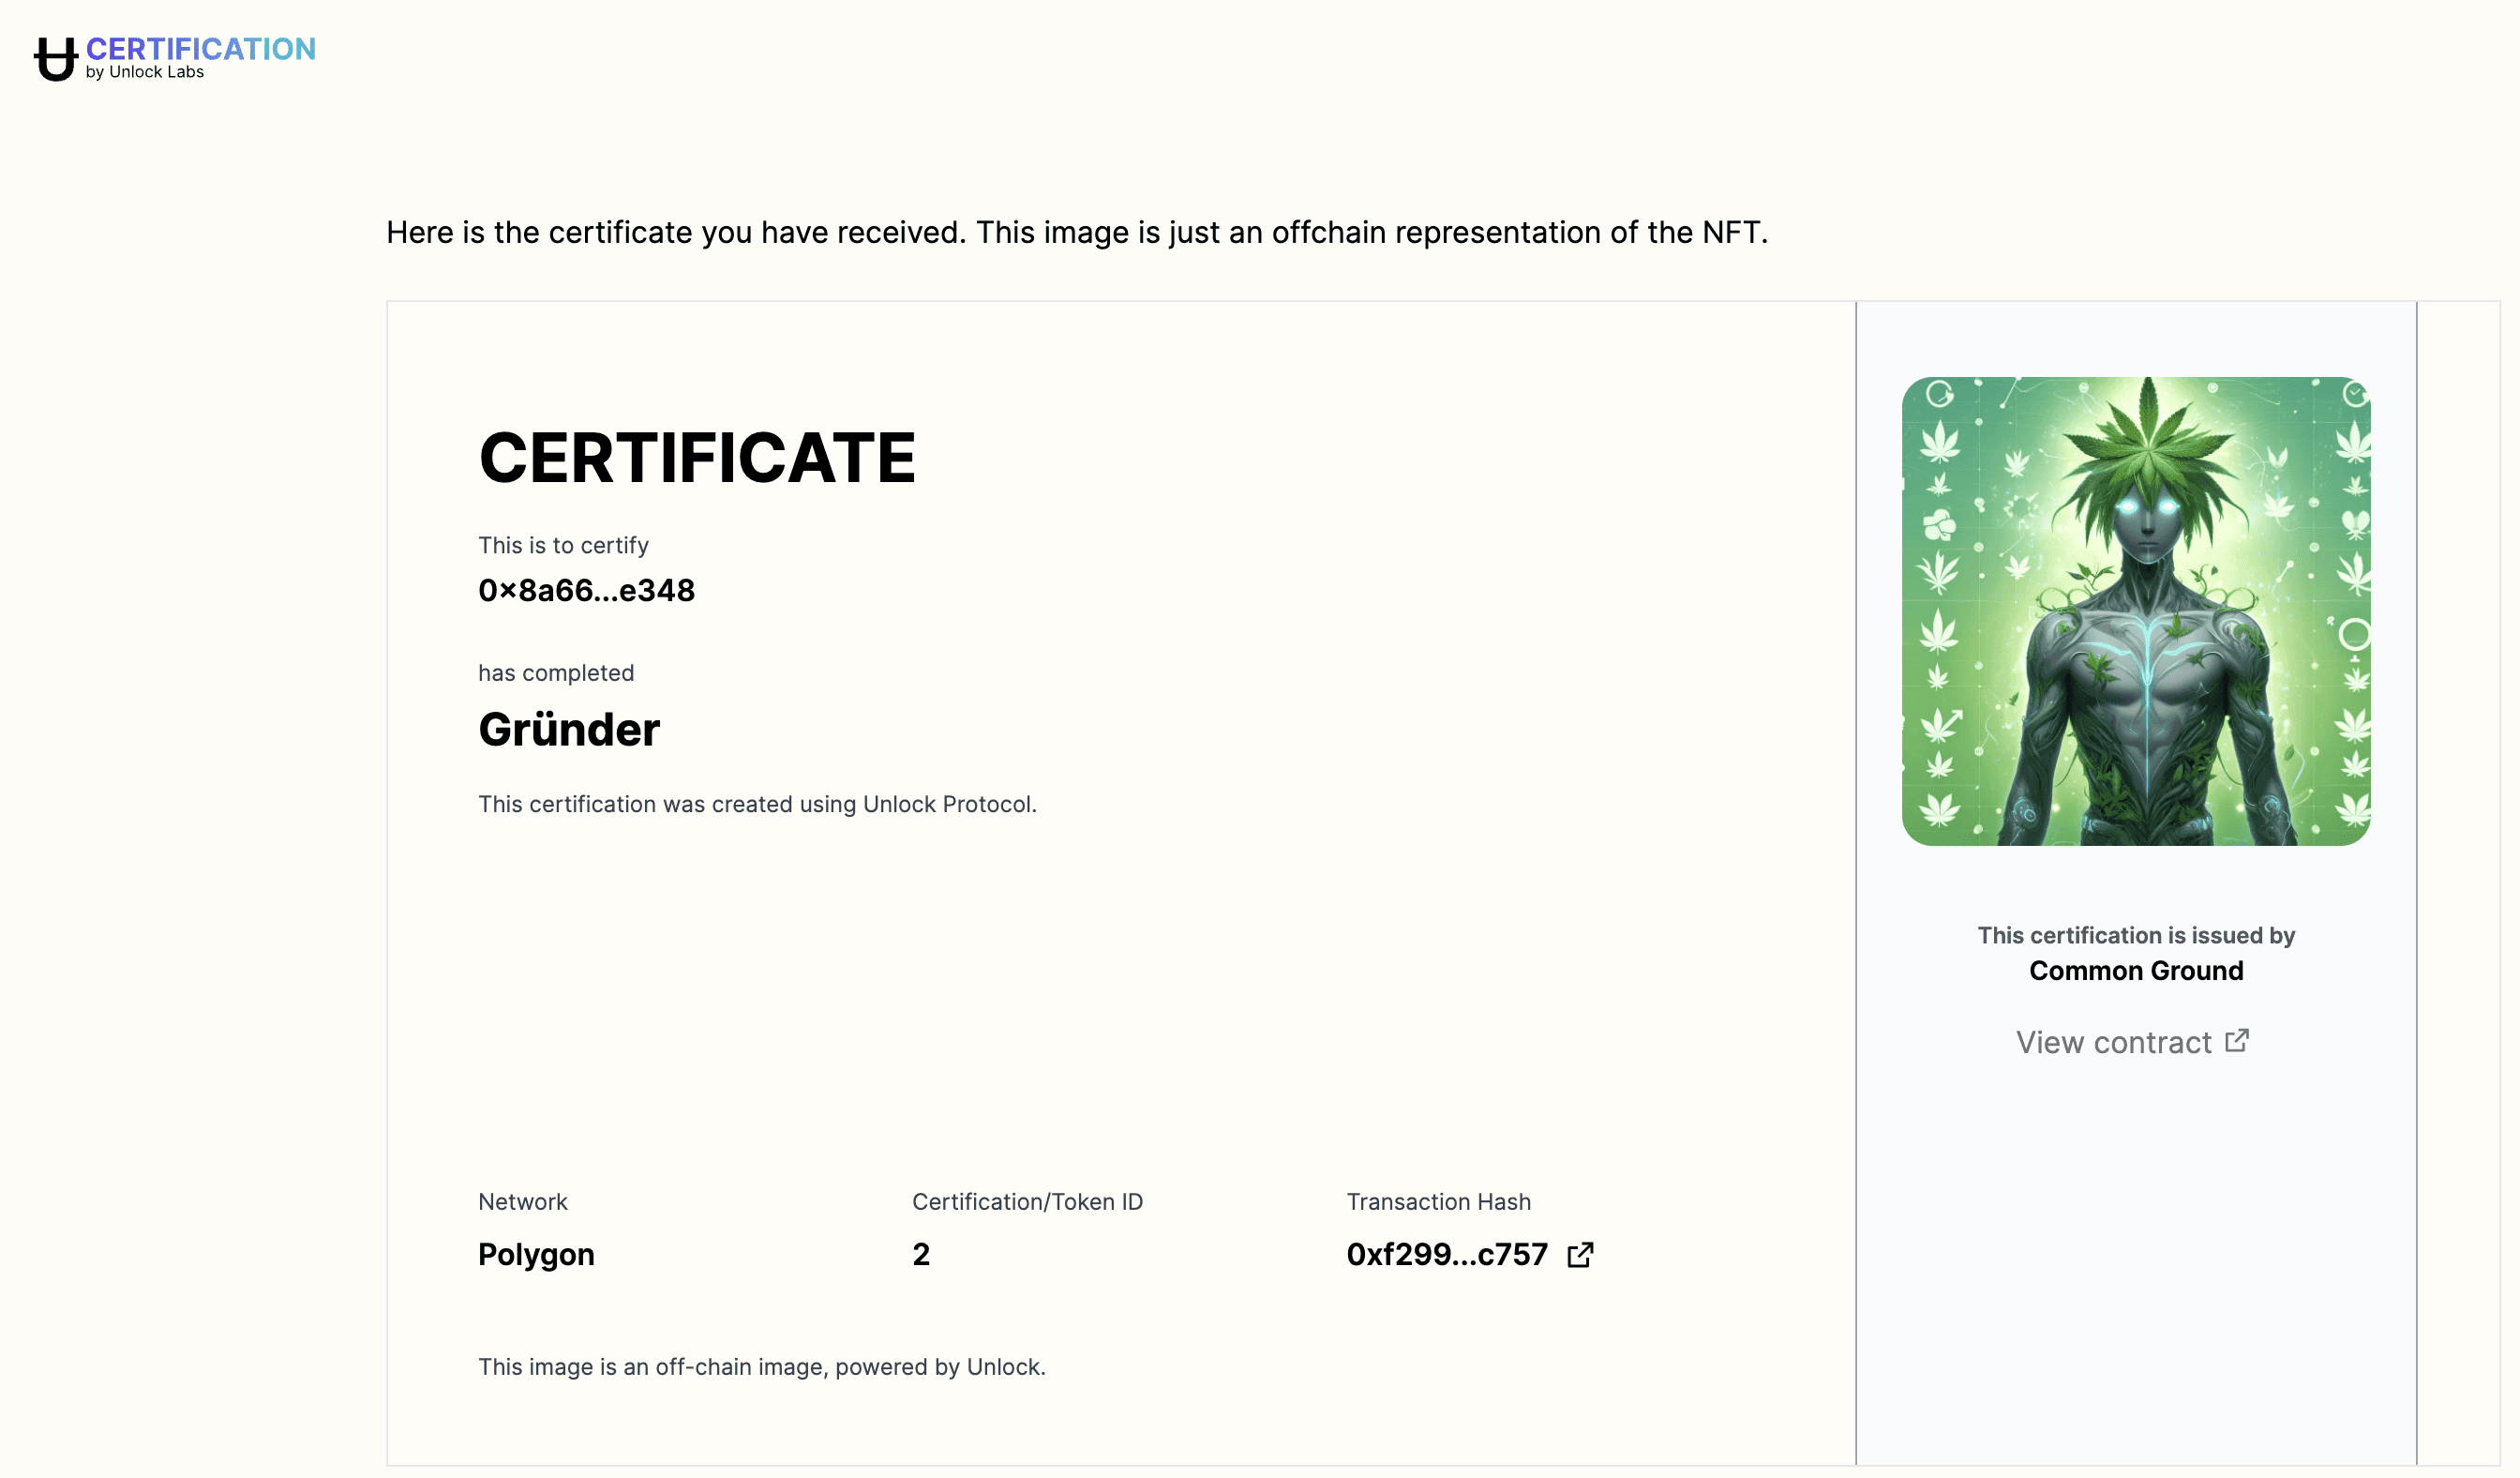
Important: to get the smart contract address of your NFT, click on "View contract" located below the image on the right. This takes you to a blockchain explorer. On there, copy the contract address. In my case it looks like this:

This contract address is important for the next step: the token-gating.
Token-gating access to your community
Now let's understand how we can leverage what we just did to create token-gated spaces in your community on Common Ground!
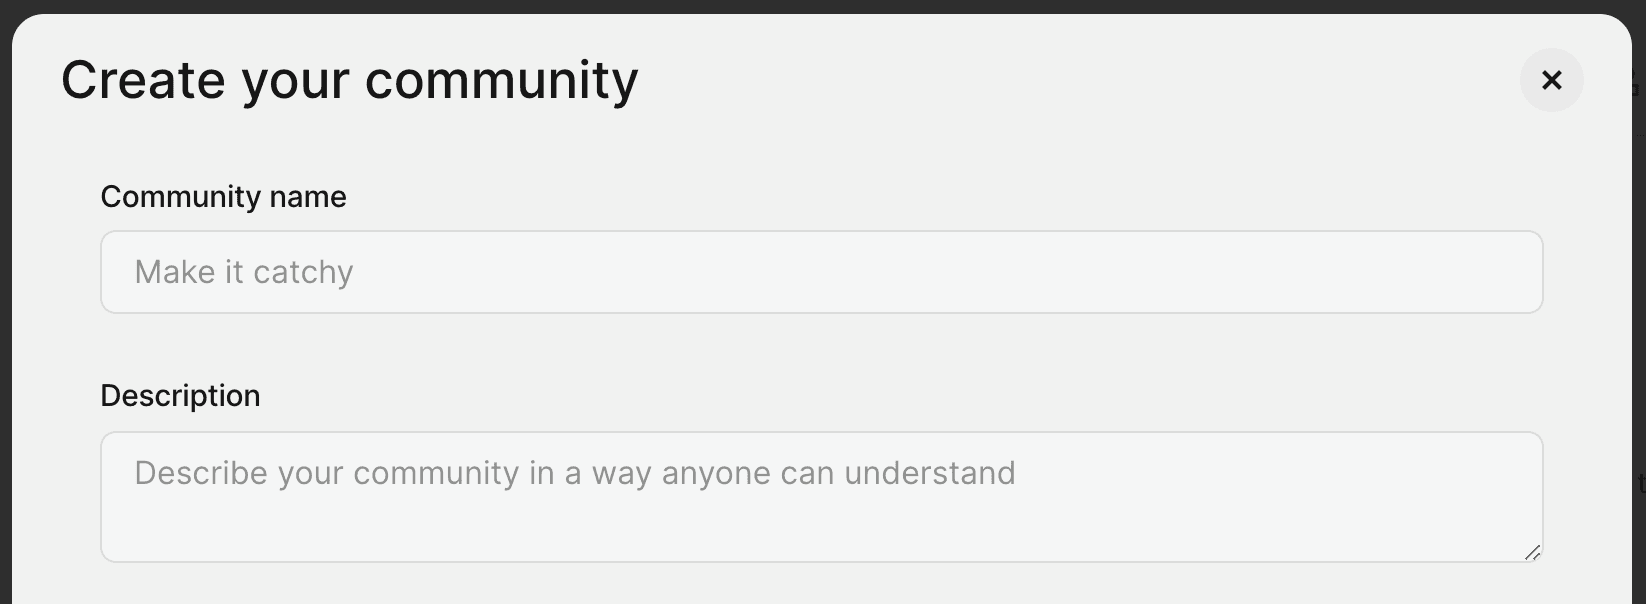
Step 1: Create a community
If you haven't yet, create your community on Common Ground:
Step 2: Access your community's admin panel
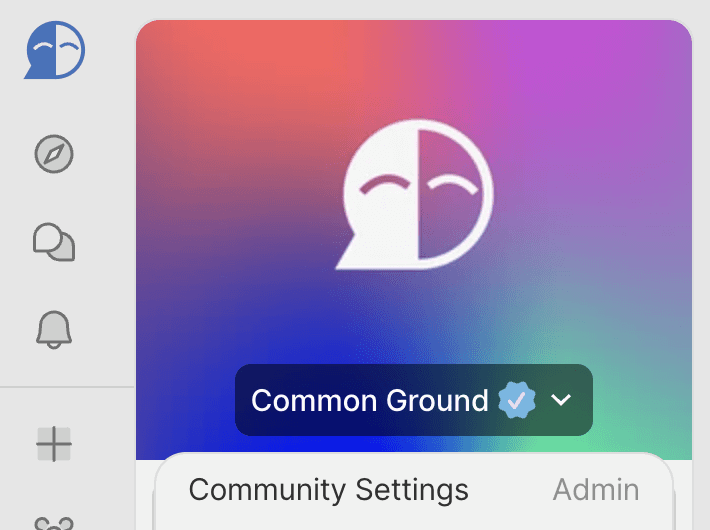
Then tap on your community's name in the sidebar to open the context dialogue for entering your community admin settings!
Step 3: Add your membership NFT as your community token
Then add your lock's smart contract address that you just created with Unlock Protocol as a community token in your admin panel:
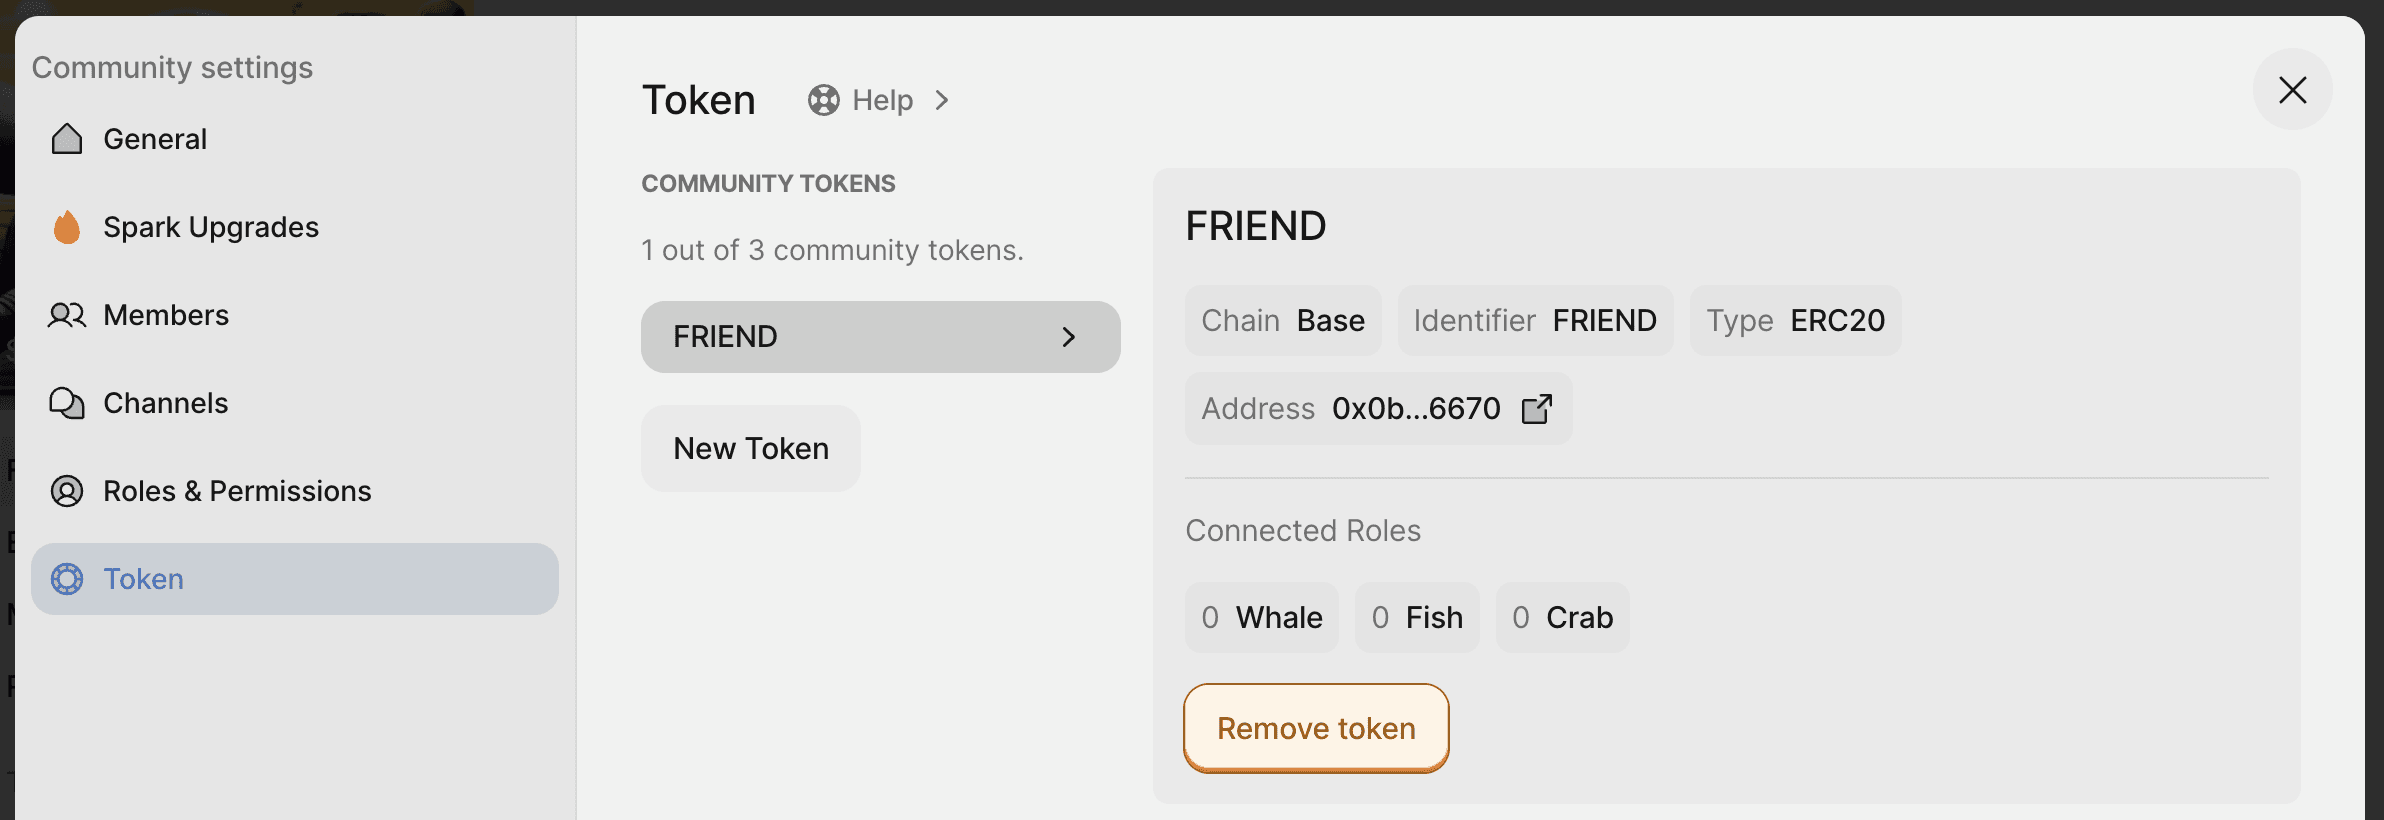
For illustration I've used the famous $FRIEND token as the community's token.
Step 4: Create a token-gated role
Now you can create one or more roles in your community that require some amount of your membership NFTs to be claimed.
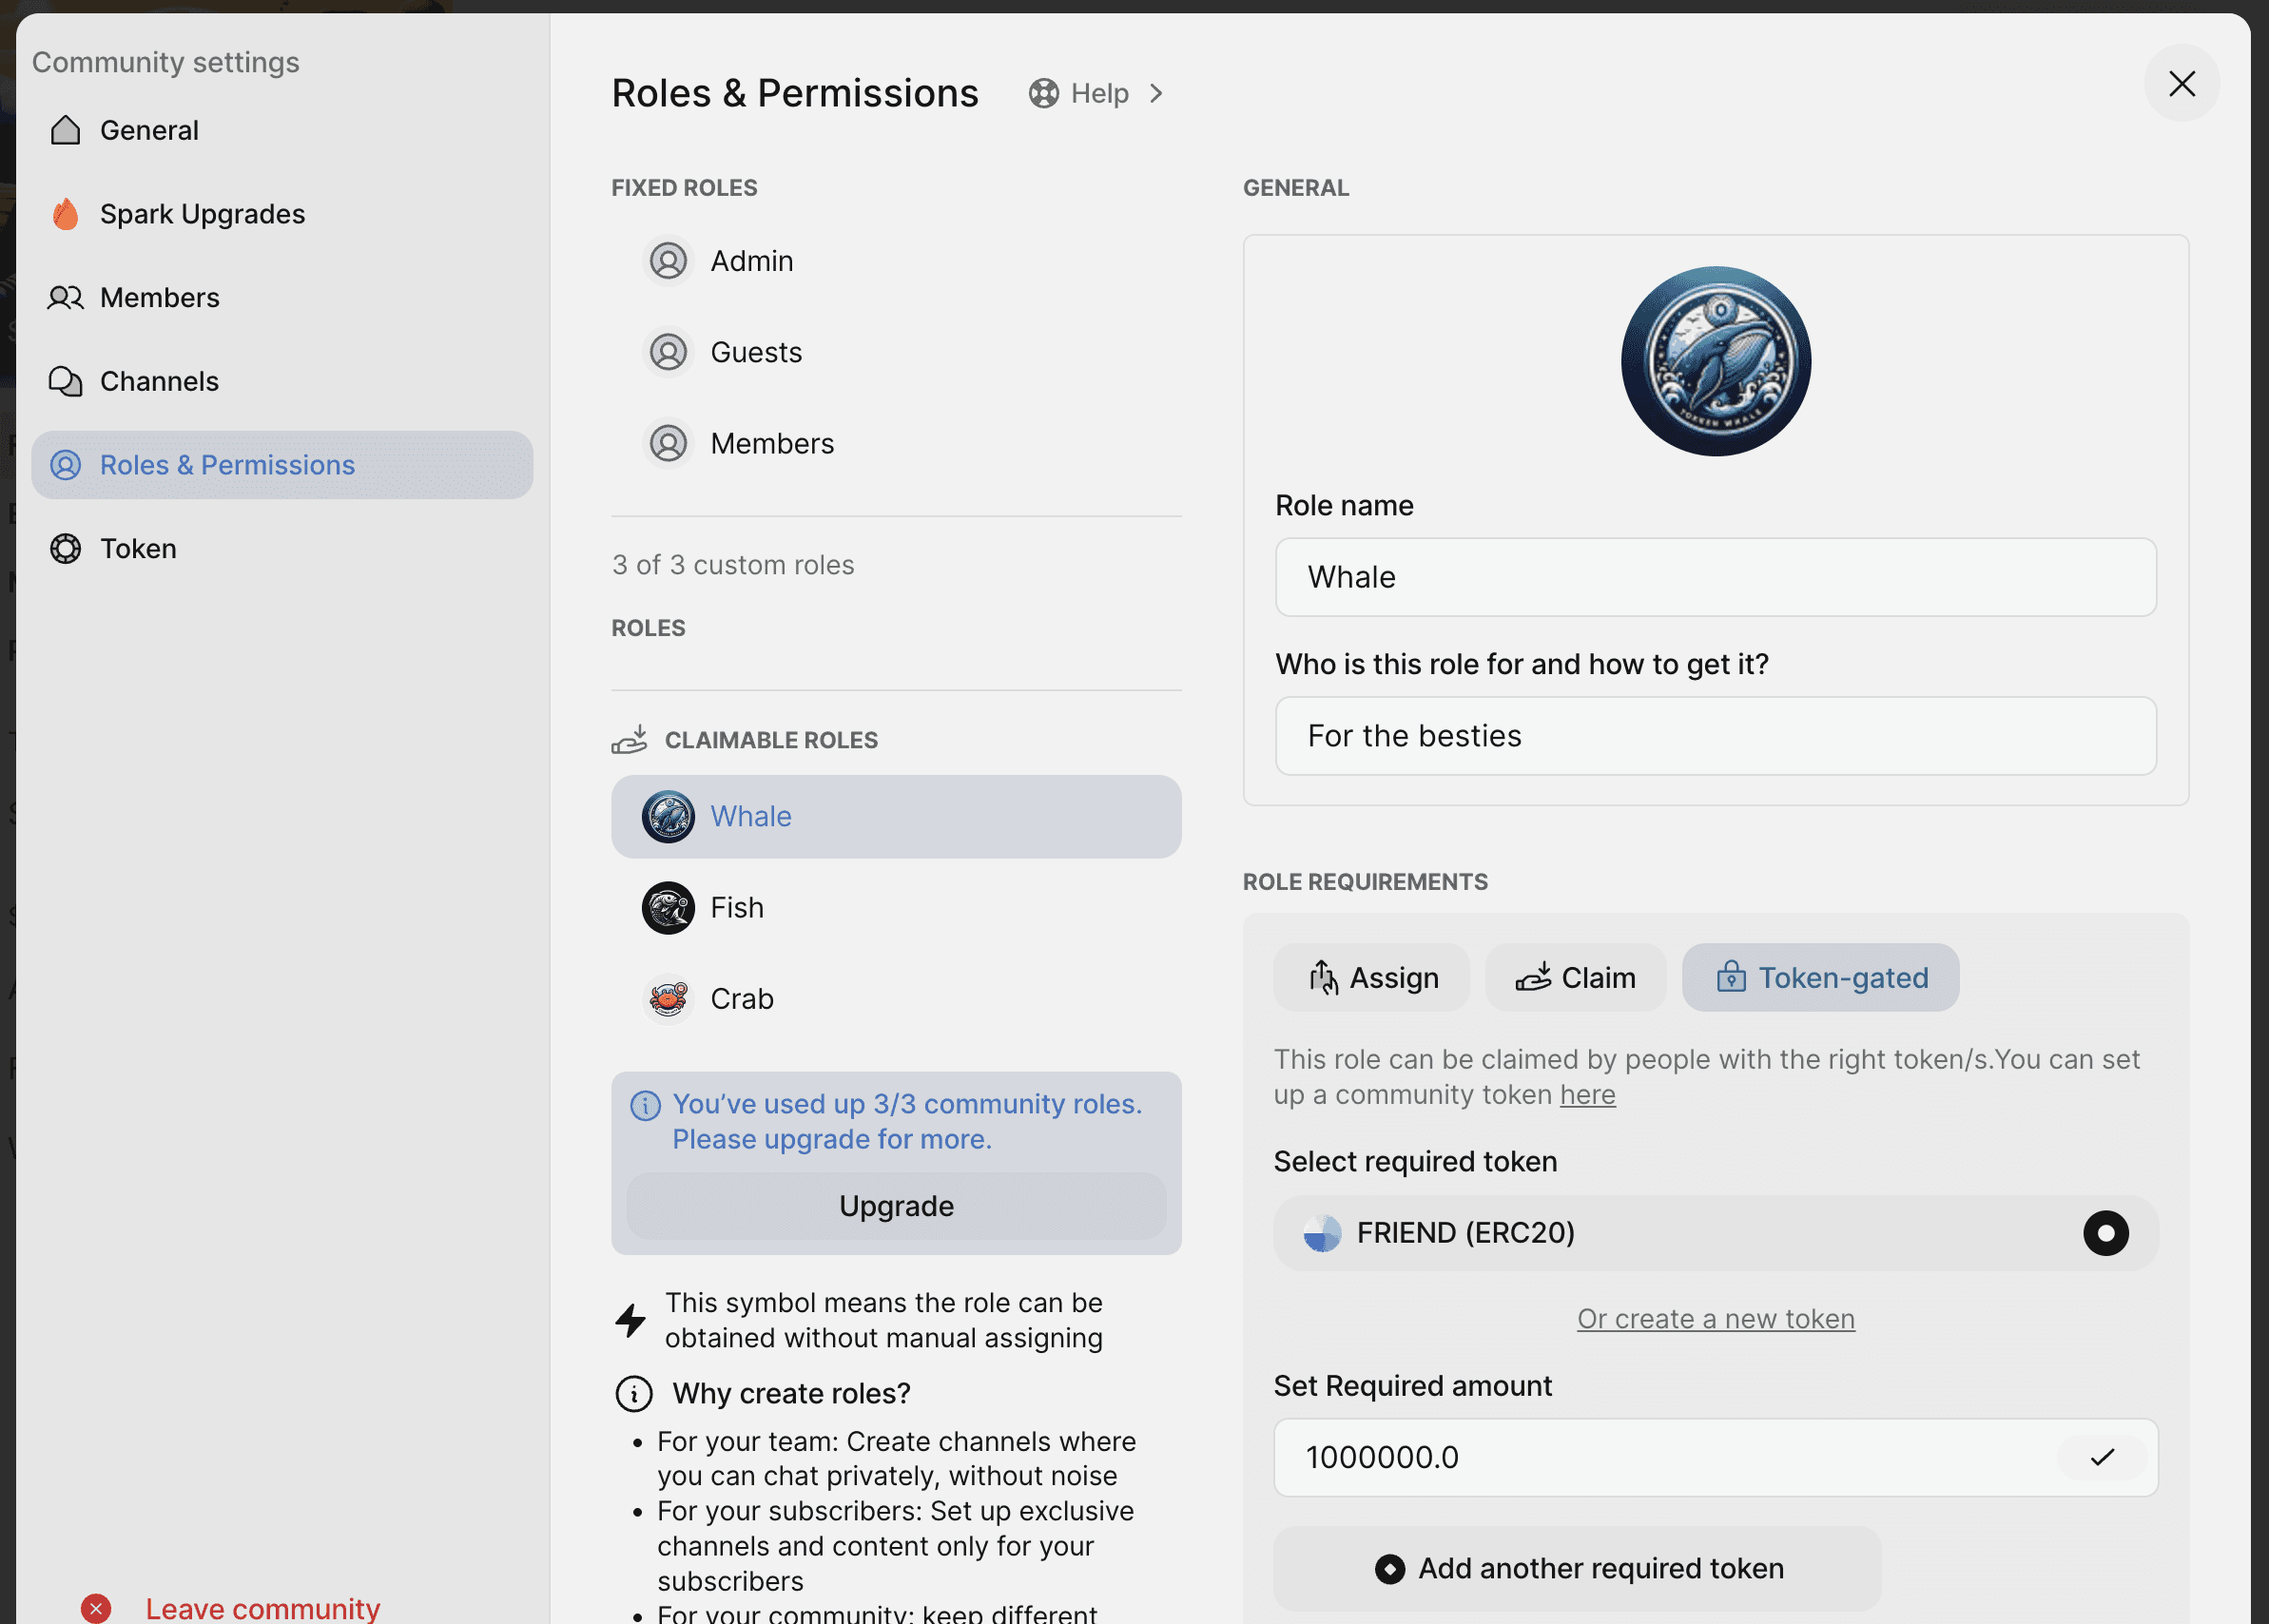
In this case I've created 3 membership tiers, where the highest tier requires a user to prove they own at least 1M tokens.
Step 5: Setup role-gated channels
Once you've created your token-gated roles, you can create as many chat channels as you like, which are only accessible to people who were able to claim your token-gated role(s).
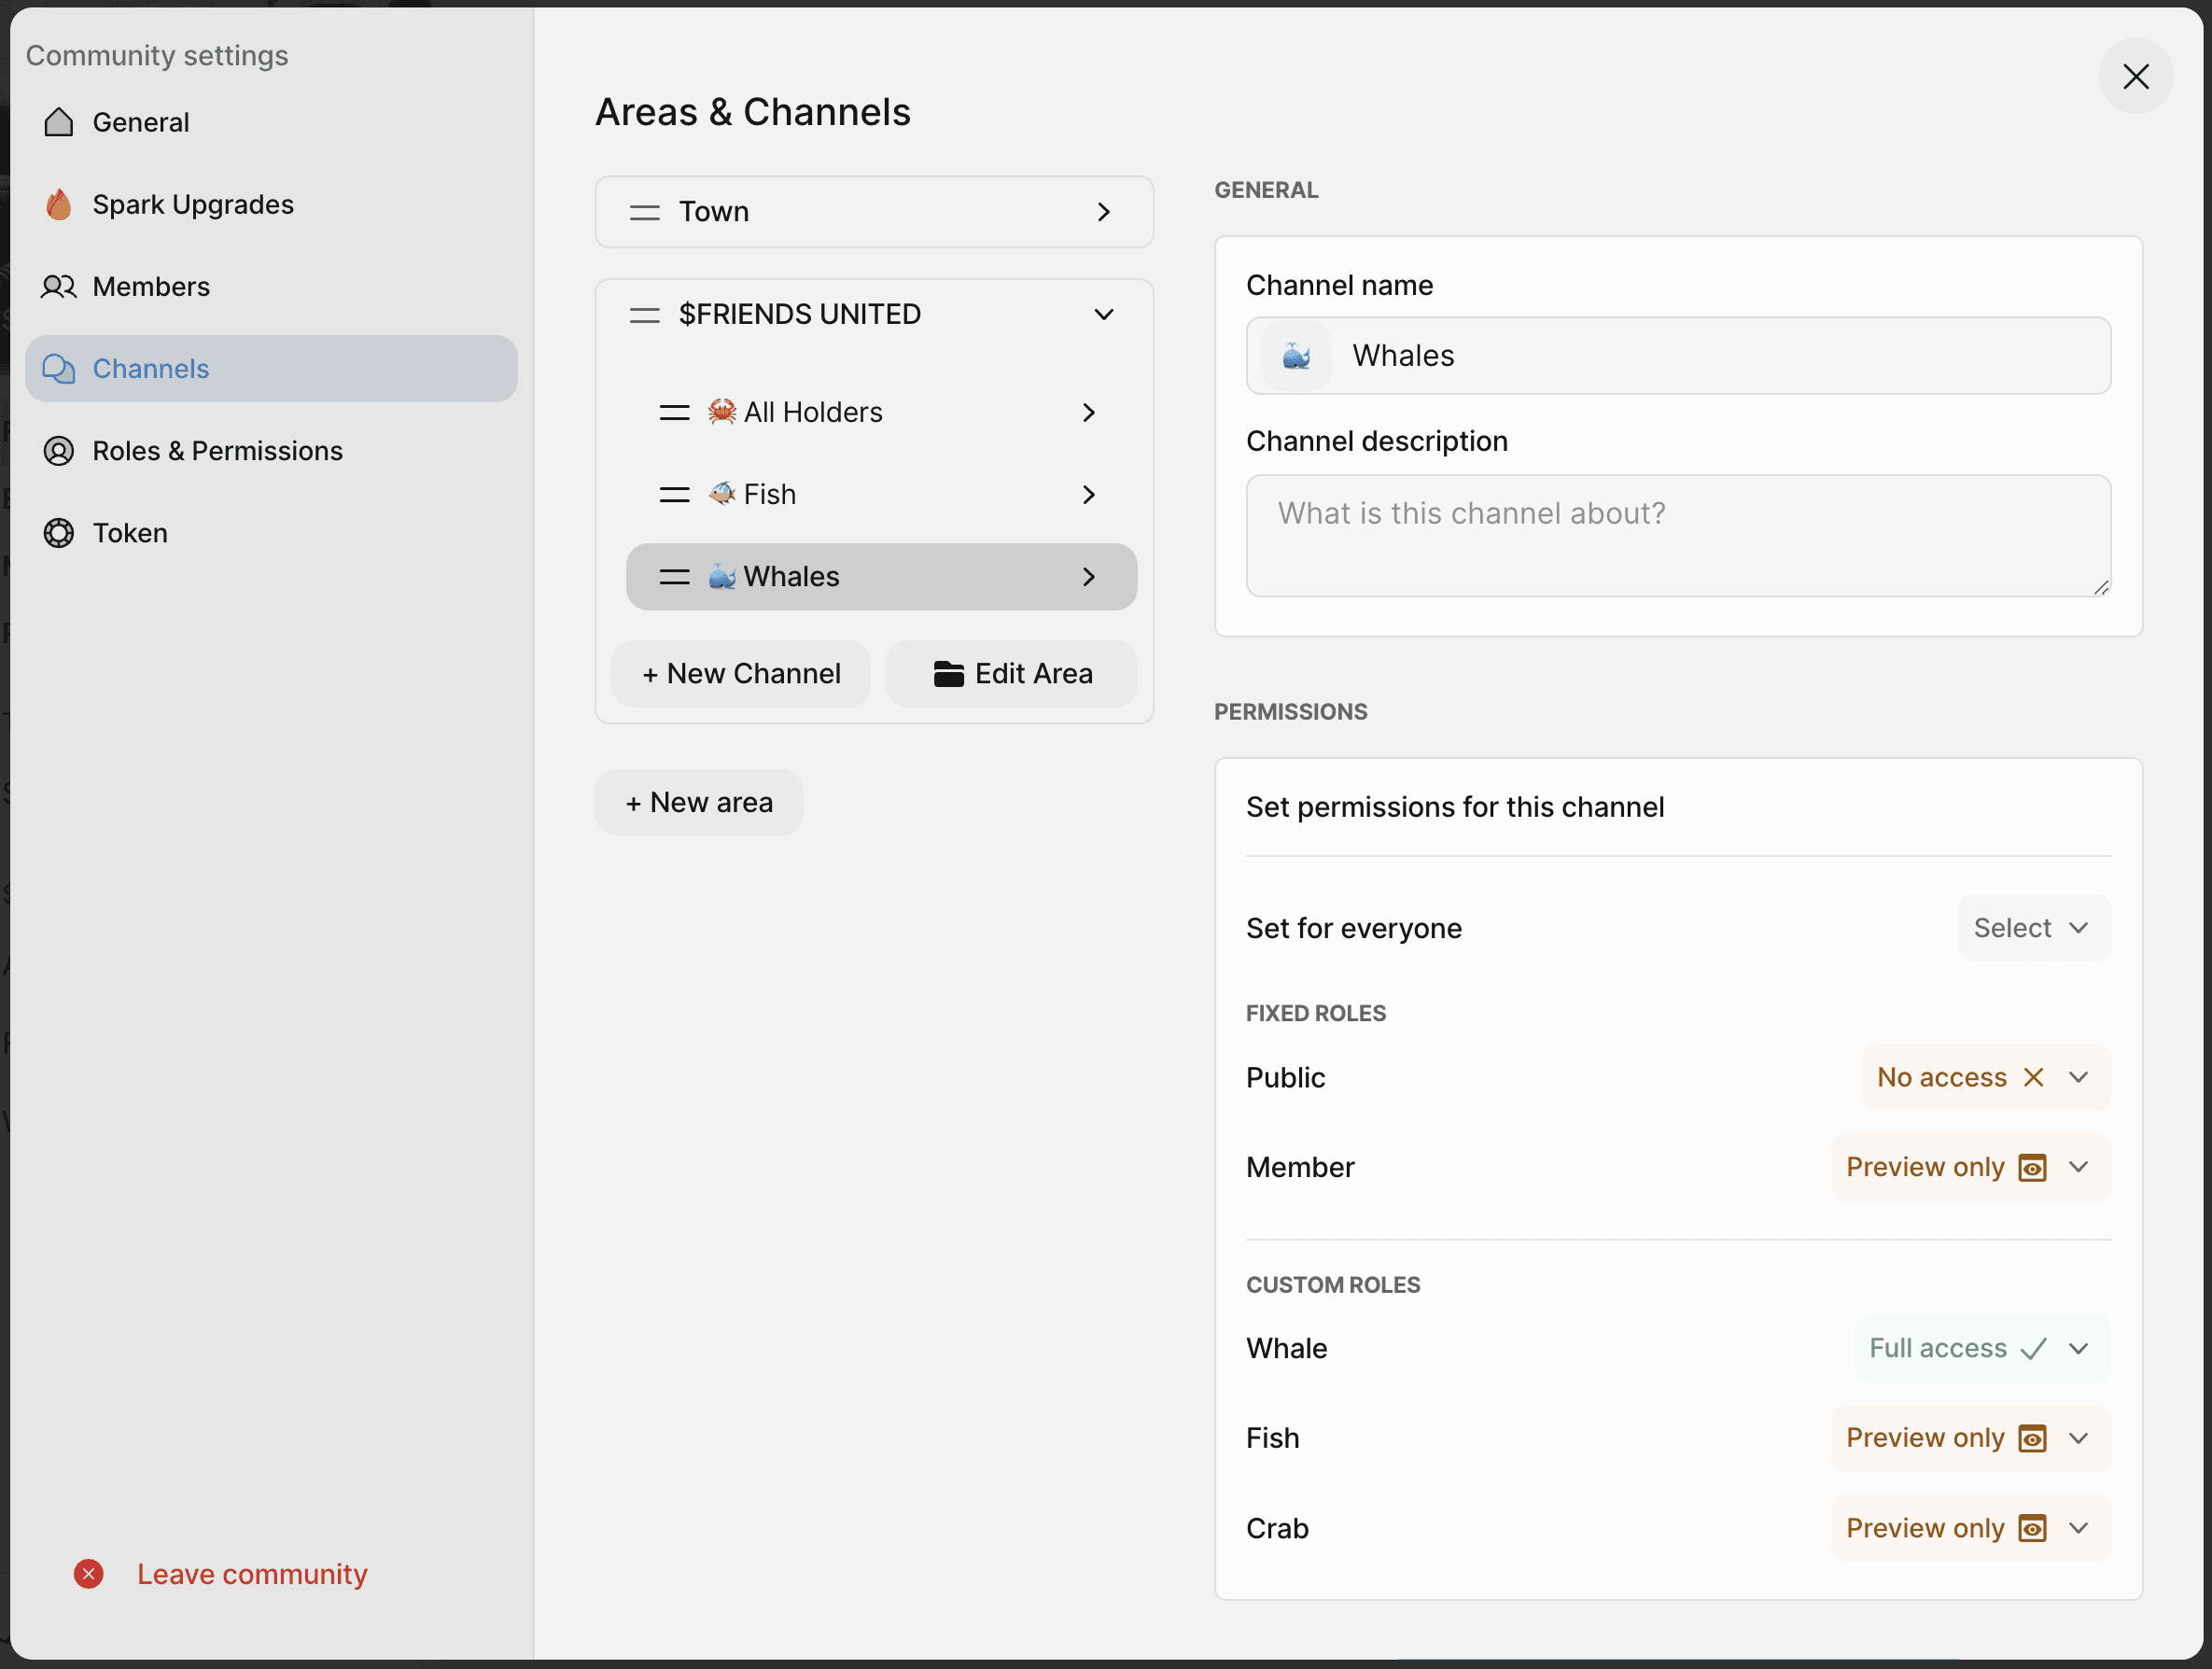
A super helpful feature is the ability to set chats & content to "preview only" for people who do not have the required role to see the content. This way, they are aware that there are things that would be available to them if they were to become a member. That's important if you want people to discover the value of a membership in your community.
Step 6: Upgrade your community to be more discoverable
If you want your community to grow, it's helpful to consider purchasing our "Publish Community" package and even the "Unique Community Url" under the Spark Upgrades tab.
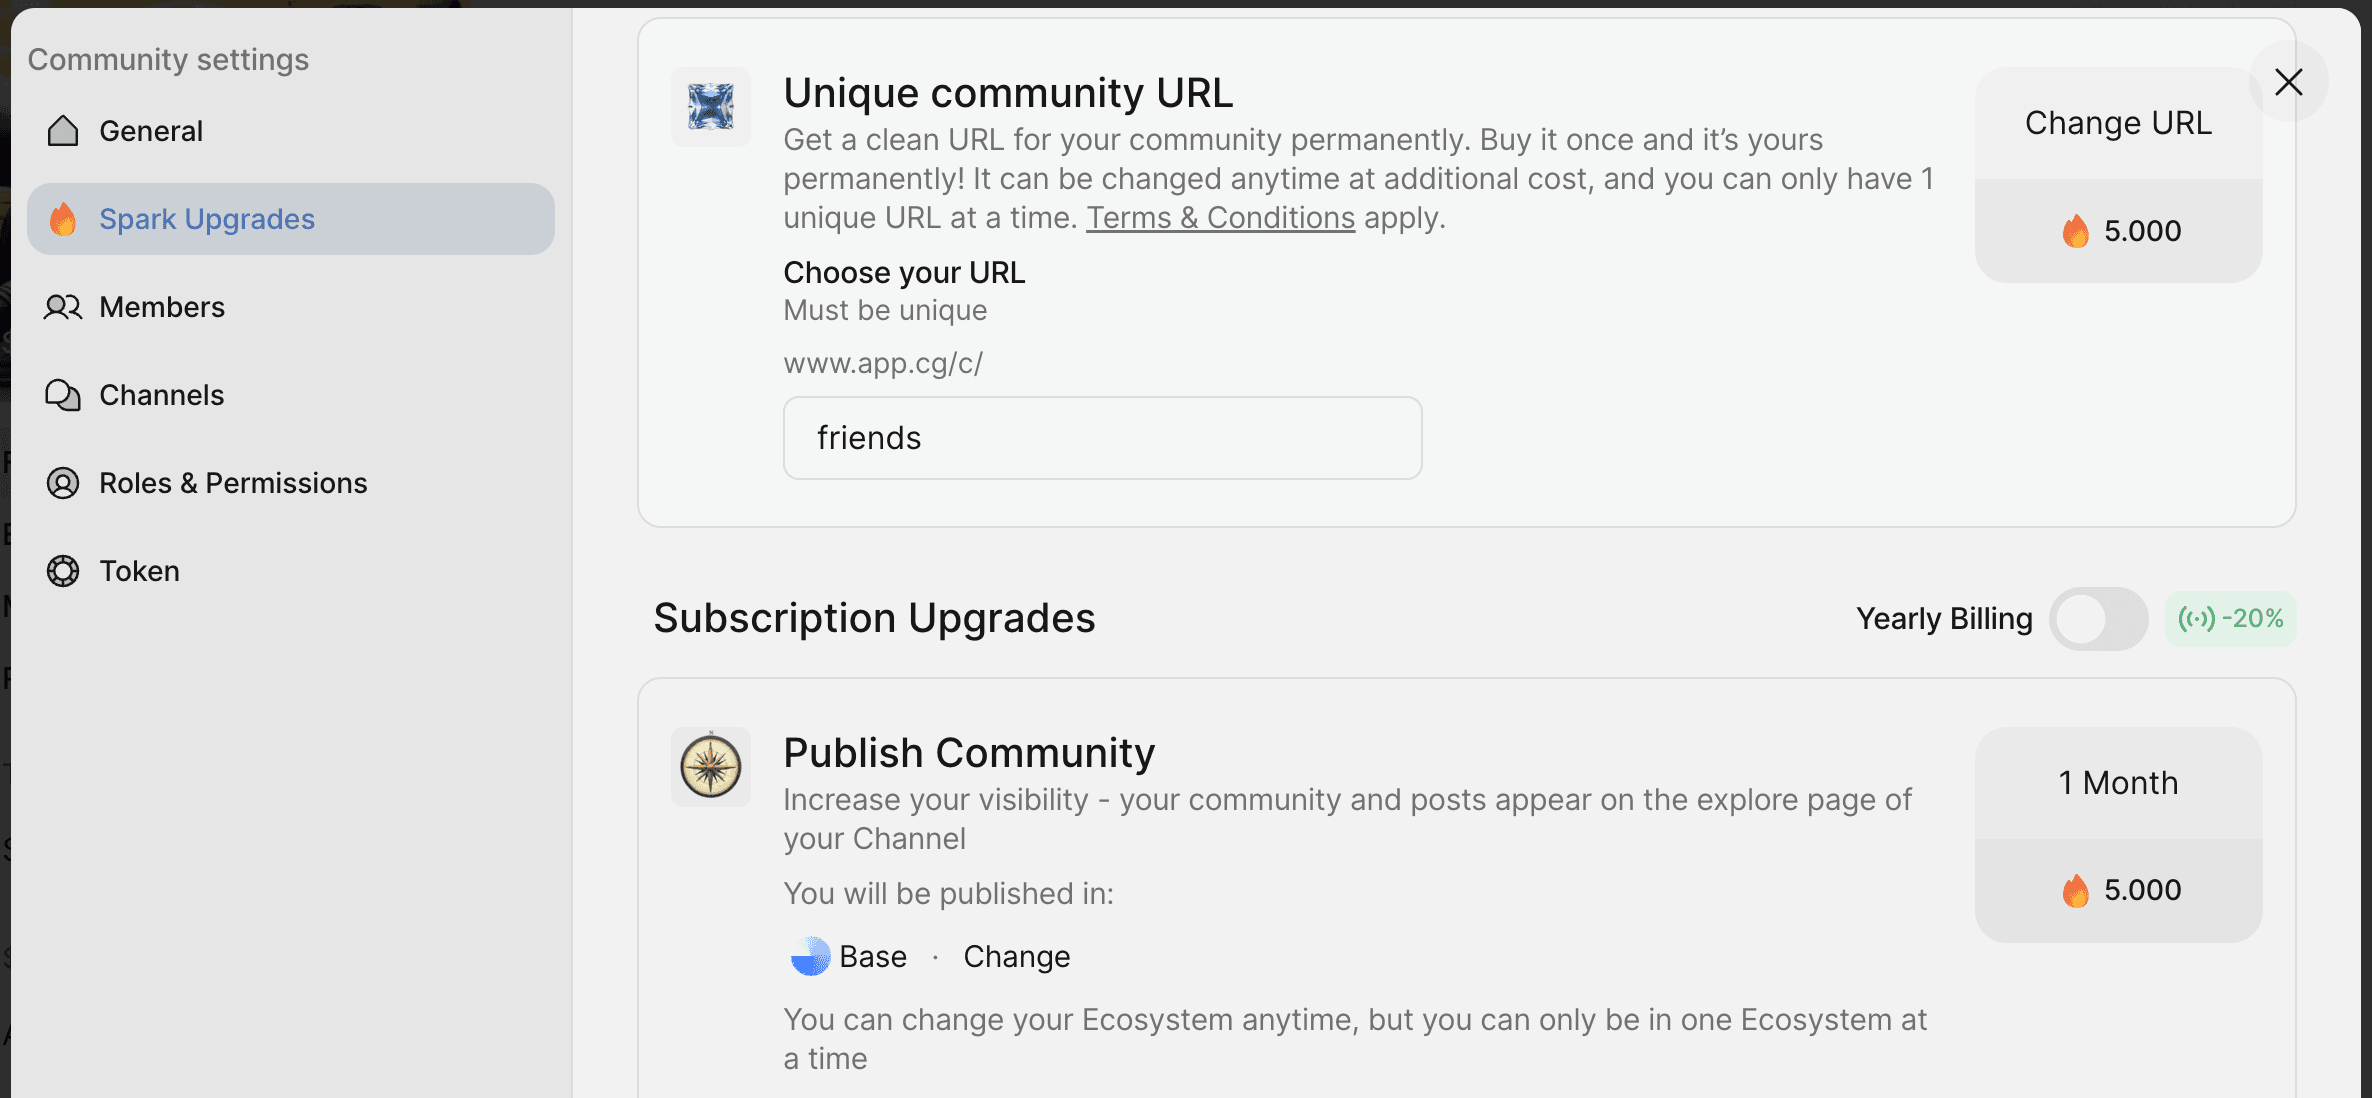
Step 7: Create some public & token-gated welcome articles
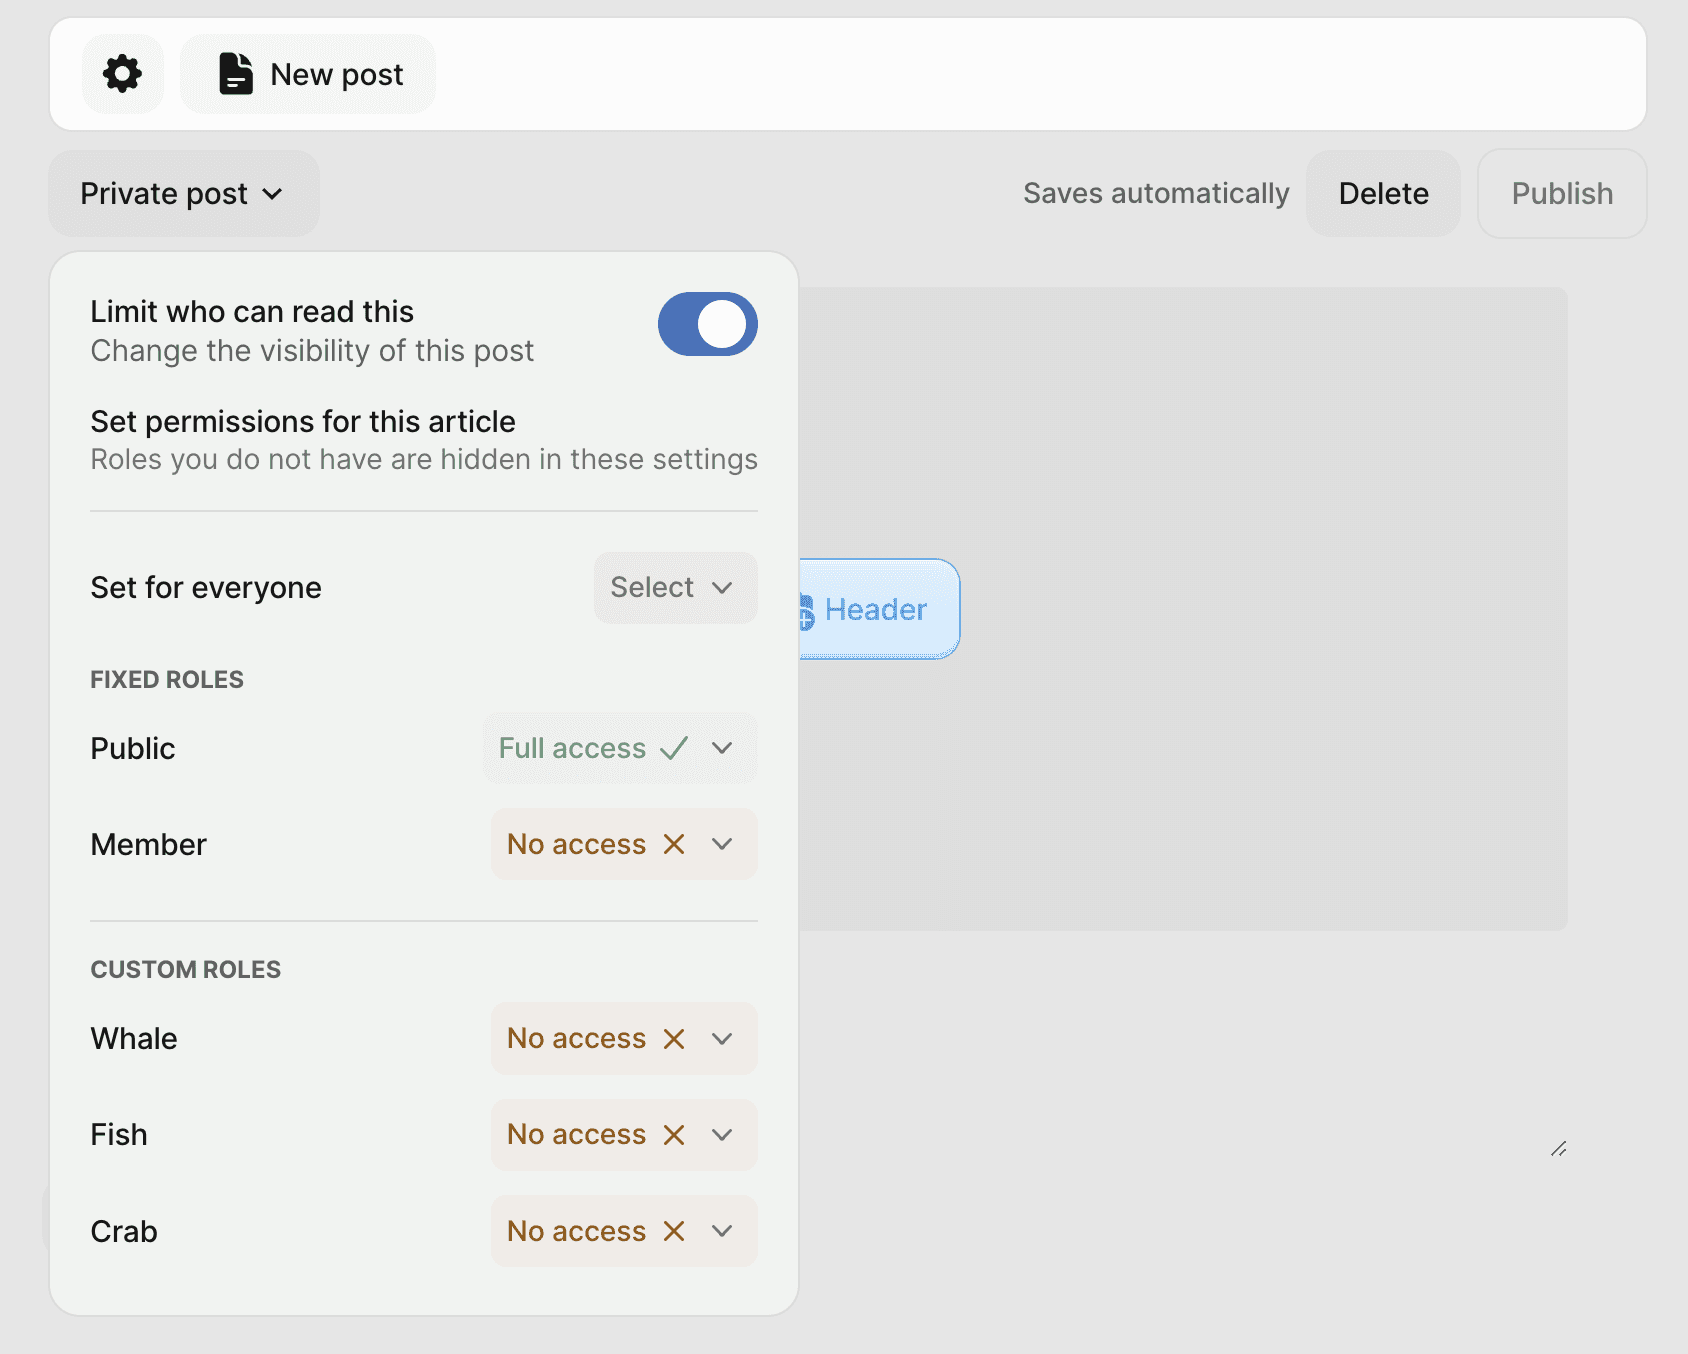
In order for both guests and newly-joined member to have a pleasant experience in your community, it's helpful to publish a bunch of blog posts with different access-levels attached. That means your guests will see different blog posts than your members. That way you can upsell your guests to members and focus on retaining your members with valuable content.
When creating a new blog post, choose who can access it, who can just "preview" it, and who cannot see it at all.
Step 8: Events & Workshops just for your paying members
To create a webinar or workshop series that's exclusive to your paying members, you can schedule live events & conduct live broadcasts and calls directly on Common Ground and tie that into the role feature just like we did with blog posts.
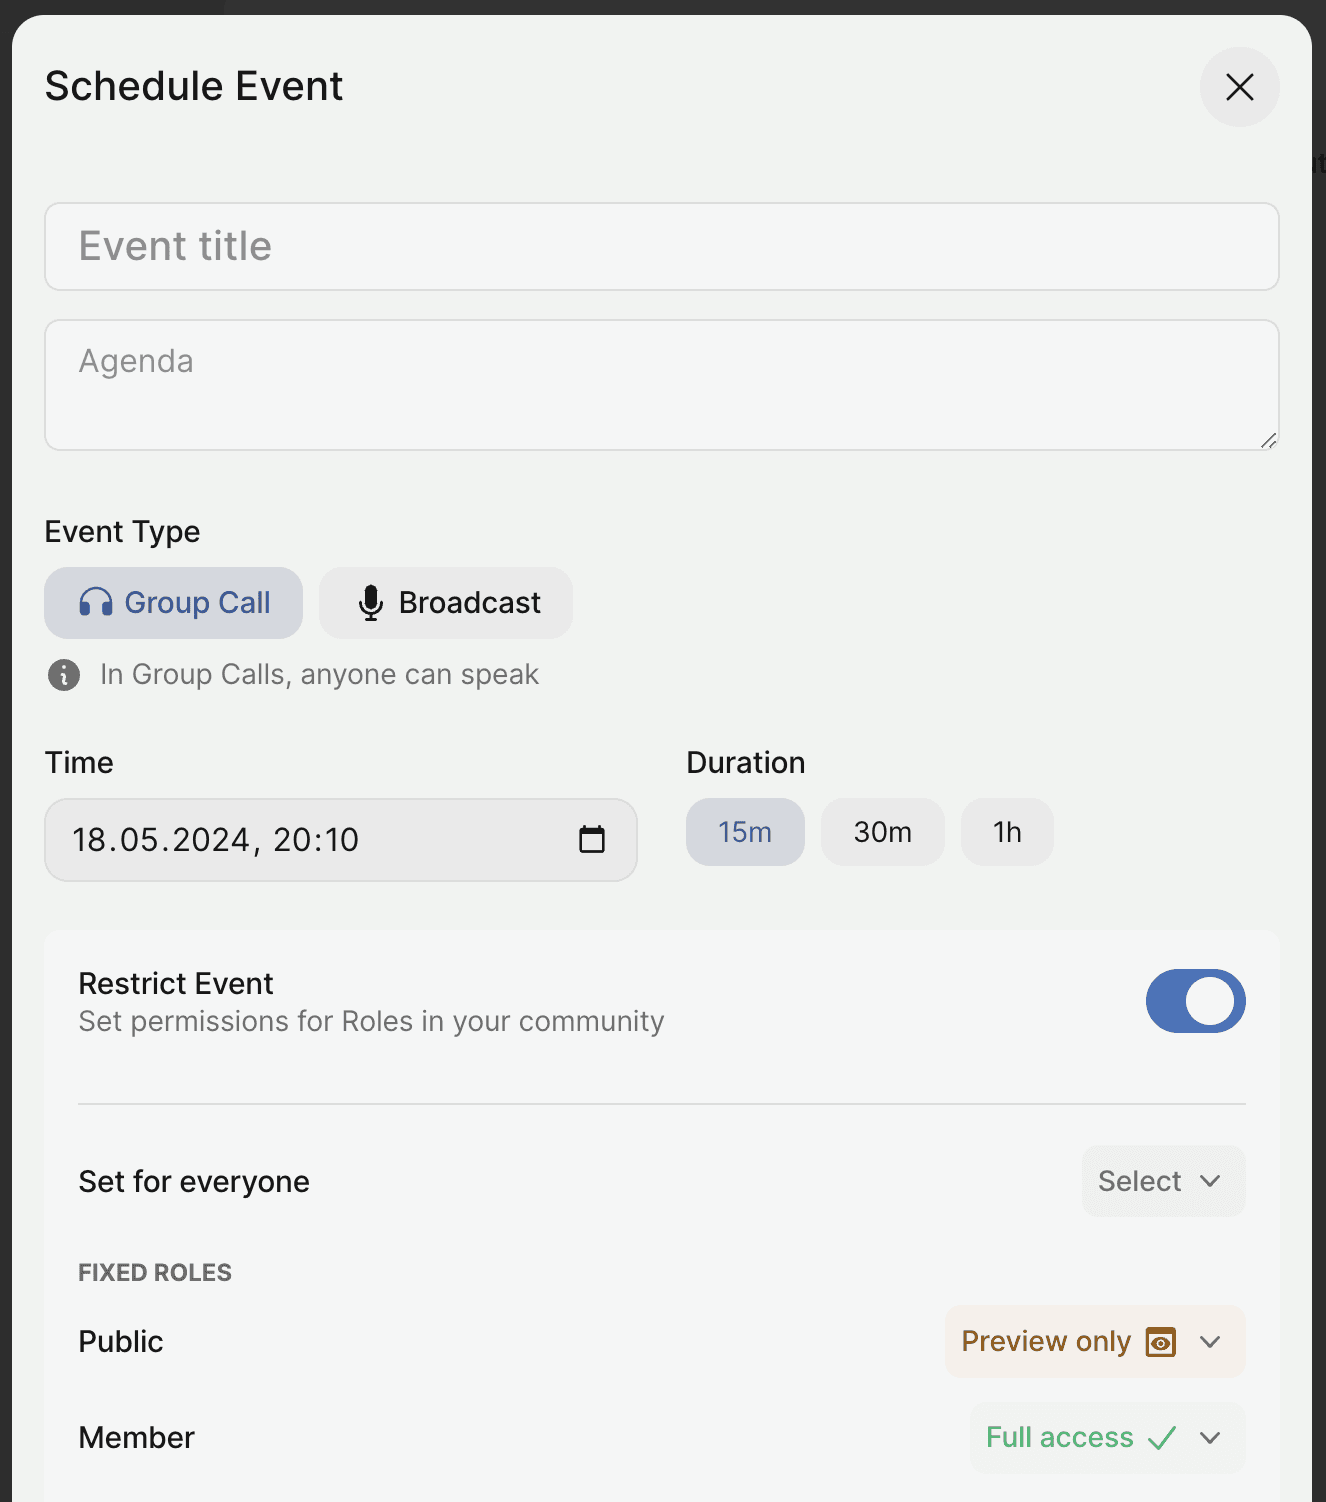
We're creating an event that all your guests can "see" but in order to RSVP and actually participate they have to become a paying member first. Your paying members can immediately RSVP, add the event to their calendar and when the day comes, immediately join your live event on Common Ground.
Conclusion
When it comes to leveraging web3 for your community, there is no better place than Common Ground. Through the power of tokens such as NFTs you can create absolutely unique experiences for your members and make a sustainable living from your community work. Did you know that we support over 15 blockchains for token-gating already on Common Ground? That means you can create your community in the ecosystem that you feel the most at home in, be it Ethereum, Base, Optimism, Arbitrum, Gnosis, Polygon, Linea, Scroll, Binance Smart Chain, zkSync, Fantom or Avalanche. Support for non-EVM chains like Solana, Near, Cardano, Bitcoin and more is coming soon. If you're interested to become a partner ecosystem on Common Ground, reach out to ola@commonground.cg .
Understanding Composability
Composability in Web3 refers to the ability of different protocols and platforms to interact seamlessly, enabling the creation of complex and customizable solutions. This modularity allows developers and creators to build upon existing components without starting from scratch.
Leveraging composability for your community means:
Integration of Tools:
Combine various Web3 tools to create a unique community that lives onchain. For instance, integrate membership management with Unlock Protocol and social interaction features from Common Ground.Customization and Flexibility:
Tailor your community features to meet specific needs. Use composable smart contracts to manage memberships, access controls, and payment systems effortlessly.Interoperability:
Ensure your community benefits from the interoperability of Web3 protocols. This means your community can interact with other platforms and services, enhancing user experience and engagement.Decentralized Ownership:
By leveraging Web3's composability, you maintain true ownership of your community by making it effectively platformless. This decentralized approach ensures that control remains with you and your members, not a central authority.
Enter Unlock Protocol
Unlock Protocol offers a set of open source and purpose built smart contracts specifically for community memberships and subscriptions. The smart contracts let you add time constraints, update pricing, and handle recurring payments.

Step-by-Step Guide to Creating a Membership NFT Contract on Unlock Using Their Website
Let's dive in. This is a step-by-step guide to create your first Membership NFT with Unlock Protocol.
Step 1: Access the Unlock Dashboard
Go to the Unlock Protocol Dashboard.
Step 2: Create a New Lock
Click on "Create Lock".
Choose between two kinds of onchain attestations: organize event and sell tickets or create a certification about someone's expertise on chain. Both of these contracts are NFT contracts.
Fill in the lock details:
Lock Name: Choose a name for your membership contract.
Currency: Select the currency (e.g., ETH, DAI).
Price: Set the price for membership.
Duration: Define the duration of the membership (e.g., 1 month, 1 year).
Set the total number of memberships available (if limited).
Choose whether memberships are transferable or not.
Step 3: Deploy the Lock
Review the details and confirm.
Approve the transaction in your wallet to deploy the lock.
For illustration purposes I created a certification-style NFT, which looks like this:

Important: to get the smart contract address of your NFT, click on "View contract" located below the image on the right. This takes you to a blockchain explorer. On there, copy the contract address. In my case it looks like this:

This contract address is important for the next step: the token-gating.
Token-gating access to your community
Now let's understand how we can leverage what we just did to create token-gated spaces in your community on Common Ground!
Step 1: Create a community
If you haven't yet, create your community on Common Ground:

Step 2: Access your community's admin panel
Then tap on your community's name in the sidebar to open the context dialogue for entering your community admin settings!

Step 3: Add your membership NFT as your community token
Then add your lock's smart contract address that you just created with Unlock Protocol as a community token in your admin panel:

For illustration I've used the famous $FRIEND token as the community's token.
Step 4: Create a token-gated role
Now you can create one or more roles in your community that require some amount of your membership NFTs to be claimed.

In this case I've created 3 membership tiers, where the highest tier requires a user to prove they own at least 1M tokens.
Step 5: Setup role-gated channels
Once you've created your token-gated roles, you can create as many chat channels as you like, which are only accessible to people who were able to claim your token-gated role(s).

A super helpful feature is the ability to set chats & content to "preview only" for people who do not have the required role to see the content. This way, they are aware that there are things that would be available to them if they were to become a member. That's important if you want people to discover the value of a membership in your community.
Step 6: Upgrade your community to be more discoverable
If you want your community to grow, it's helpful to consider purchasing our "Publish Community" package and even the "Unique Community Url" under the Spark Upgrades tab.

Step 7: Create some public & token-gated welcome articles
In order for both guests and newly-joined member to have a pleasant experience in your community, it's helpful to publish a bunch of blog posts with different access-levels attached. That means your guests will see different blog posts than your members. That way you can upsell your guests to members and focus on retaining your members with valuable content.
When creating a new blog post, choose who can access it, who can just "preview" it, and who cannot see it at all.

Step 8: Events & Workshops just for your paying members
To create a webinar or workshop series that's exclusive to your paying members, you can schedule live events & conduct live broadcasts and calls directly on Common Ground and tie that into the role feature just like we did with blog posts.

We're creating an event that all your guests can "see" but in order to RSVP and actually participate they have to become a paying member first. Your paying members can immediately RSVP, add the event to their calendar and when the day comes, immediately join your live event on Common Ground.
Conclusion
When it comes to leveraging web3 for your community, there is no better place than Common Ground. Through the power of tokens such as NFTs you can create absolutely unique experiences for your members and make a sustainable living from your community work. Did you know that we support over 15 blockchains for token-gating already on Common Ground? That means you can create your community in the ecosystem that you feel the most at home in, be it Ethereum, Base, Optimism, Arbitrum, Gnosis, Polygon, Linea, Scroll, Binance Smart Chain, zkSync, Fantom or Avalanche. Support for non-EVM chains like Solana, Near, Cardano, Bitcoin and more is coming soon. If you're interested to become a partner ecosystem on Common Ground, reach out to ola@commonground.cg .
Understanding Composability
Composability in Web3 refers to the ability of different protocols and platforms to interact seamlessly, enabling the creation of complex and customizable solutions. This modularity allows developers and creators to build upon existing components without starting from scratch.
Leveraging composability for your community means:
Integration of Tools:
Combine various Web3 tools to create a unique community that lives onchain. For instance, integrate membership management with Unlock Protocol and social interaction features from Common Ground.Customization and Flexibility:
Tailor your community features to meet specific needs. Use composable smart contracts to manage memberships, access controls, and payment systems effortlessly.Interoperability:
Ensure your community benefits from the interoperability of Web3 protocols. This means your community can interact with other platforms and services, enhancing user experience and engagement.Decentralized Ownership:
By leveraging Web3's composability, you maintain true ownership of your community by making it effectively platformless. This decentralized approach ensures that control remains with you and your members, not a central authority.
Enter Unlock Protocol
Unlock Protocol offers a set of open source and purpose built smart contracts specifically for community memberships and subscriptions. The smart contracts let you add time constraints, update pricing, and handle recurring payments.

Step-by-Step Guide to Creating a Membership NFT Contract on Unlock Using Their Website
Let's dive in. This is a step-by-step guide to create your first Membership NFT with Unlock Protocol.
Step 1: Access the Unlock Dashboard
Go to the Unlock Protocol Dashboard.
Step 2: Create a New Lock
Click on "Create Lock".
Choose between two kinds of onchain attestations: organize event and sell tickets or create a certification about someone's expertise on chain. Both of these contracts are NFT contracts.
Fill in the lock details:
Lock Name: Choose a name for your membership contract.
Currency: Select the currency (e.g., ETH, DAI).
Price: Set the price for membership.
Duration: Define the duration of the membership (e.g., 1 month, 1 year).
Set the total number of memberships available (if limited).
Choose whether memberships are transferable or not.
Step 3: Deploy the Lock
Review the details and confirm.
Approve the transaction in your wallet to deploy the lock.
For illustration purposes I created a certification-style NFT, which looks like this:

Important: to get the smart contract address of your NFT, click on "View contract" located below the image on the right. This takes you to a blockchain explorer. On there, copy the contract address. In my case it looks like this:

This contract address is important for the next step: the token-gating.
Token-gating access to your community
Now let's understand how we can leverage what we just did to create token-gated spaces in your community on Common Ground!
Step 1: Create a community
If you haven't yet, create your community on Common Ground:

Step 2: Access your community's admin panel
Then tap on your community's name in the sidebar to open the context dialogue for entering your community admin settings!

Step 3: Add your membership NFT as your community token
Then add your lock's smart contract address that you just created with Unlock Protocol as a community token in your admin panel:

For illustration I've used the famous $FRIEND token as the community's token.
Step 4: Create a token-gated role
Now you can create one or more roles in your community that require some amount of your membership NFTs to be claimed.

In this case I've created 3 membership tiers, where the highest tier requires a user to prove they own at least 1M tokens.
Step 5: Setup role-gated channels
Once you've created your token-gated roles, you can create as many chat channels as you like, which are only accessible to people who were able to claim your token-gated role(s).

A super helpful feature is the ability to set chats & content to "preview only" for people who do not have the required role to see the content. This way, they are aware that there are things that would be available to them if they were to become a member. That's important if you want people to discover the value of a membership in your community.
Step 6: Upgrade your community to be more discoverable
If you want your community to grow, it's helpful to consider purchasing our "Publish Community" package and even the "Unique Community Url" under the Spark Upgrades tab.

Step 7: Create some public & token-gated welcome articles
In order for both guests and newly-joined member to have a pleasant experience in your community, it's helpful to publish a bunch of blog posts with different access-levels attached. That means your guests will see different blog posts than your members. That way you can upsell your guests to members and focus on retaining your members with valuable content.
When creating a new blog post, choose who can access it, who can just "preview" it, and who cannot see it at all.

Step 8: Events & Workshops just for your paying members
To create a webinar or workshop series that's exclusive to your paying members, you can schedule live events & conduct live broadcasts and calls directly on Common Ground and tie that into the role feature just like we did with blog posts.

We're creating an event that all your guests can "see" but in order to RSVP and actually participate they have to become a paying member first. Your paying members can immediately RSVP, add the event to their calendar and when the day comes, immediately join your live event on Common Ground.
Conclusion
When it comes to leveraging web3 for your community, there is no better place than Common Ground. Through the power of tokens such as NFTs you can create absolutely unique experiences for your members and make a sustainable living from your community work. Did you know that we support over 15 blockchains for token-gating already on Common Ground? That means you can create your community in the ecosystem that you feel the most at home in, be it Ethereum, Base, Optimism, Arbitrum, Gnosis, Polygon, Linea, Scroll, Binance Smart Chain, zkSync, Fantom or Avalanche. Support for non-EVM chains like Solana, Near, Cardano, Bitcoin and more is coming soon. If you're interested to become a partner ecosystem on Common Ground, reach out to ola@commonground.cg .
Read more articles


Web3 for All
Consensys, the company behind Metamask, Infura, Linea and other significant projects in web3, features Common Ground prominently on their blog.

·
Oct 2, 2024


The App Revolution: what's hot in web3 right now?
After years of intense focus on infrastructure and protocols, the spotlight is finally shifting to applications. In this blog post, we'll dive deep into Web3 applications, exploring how they're reshaping various aspects of our digital lives.

Florian Glatz ·
Sep 26, 2024


Ecosystems as Groups of Groups: a new primitive in large-scale coordination?
Web3 more than any other sector of the economy explicitely designs, develops and evolves the idea of ecosystems. For the first time, a group of researchers in web3 has analyzed the ecosystem phenomenon as an emerging group of groups primitive.

·
Sep 5, 2024
Menu
Menu
